Last Christmas (I gave you my heart… jokes), I received an iPad Air from my amazing partner, Gilly. I know that I’m a little late to the tablet party, but I had been waiting around for a particular mixture in design and hardware that was slick, light and powerful. For me, this was Apple’s latest offering. Due to the enormous size of the iOS store, I also found that any musical need that might arise could be better fulfilled with an Apple device. Having said that, I’ve also collected a bunch of great iPhone apps that are universal for the tablet and phone. Some of the ones presented below, have been tested frequently over the years on my iPhone, so I’m already pretty familiar with them.

Without further adieu, let me present to you…

“5 iPad apps that I deem as essential for any Musician looking to use their iPad as a practicing or performing tool.”

The prices listed below are taken from today’s date in the Australian app store.

1. Guitar Toolkit

Guitar Toolkit iOS App OK, so this one is mostly aimed at the string instruments (guitar, bass, uke, banjo etc.) with its scales, chords and arpeggio builders/finders, but it also has a super cool metronome which can double as a drum-machine and an amazingly accurate tuner. When compared to other smartphone tuners that friends or students have shown me, the one in Guitar Toolkit has always trumped and left them asking “what’s that app again?”. This accuracy increases when the app is set to the correct instrument. For example, when set to bass guitar (which also changes the scales, arpeggios and chords), the tuner picks up the frequencies from a bass guitar with more ease. The tuner can also be set between 2 modes where it will look for the correct note according to the instrument selected or a chromatic mode which is good for all occasions (including alternative tunings).

I use this iPad app all of the time. While the tuner and metronome features have found themselves a part of my daily practice routine (I also use the tuner for many gigs), the other additions have at many times been extremely helpful resources. There are many other features in this app, such as those offered as an in-app purchases, however so far I haven’t felt the need to investigate further.

For more information, check out the app developers’ website here: Agile Partners

Cost: $10.49

If my writeup is enough to convince you to get it, click here:

Download Guitar Toolkit on the iOS App Store

2. Music Journal

Music Journal Keeping a log of what you have practiced and writing down what you intend to practice is a must for anyone looking to get solid results out of their instrument. Writing down intentions for practice and organising what to do beforehand is the best way to effectively manage the time that you spend on your instrument and make sure that there is as little stuffing around as possible. Keeping a record of what you have worked on, for how long and at what level you’ve achieved so far (e.g. bpm or section) is extremely helpful when setting goals for future practice and reflecting on the hard work that you have put in so far. If anything, this will mean a boost to self confidence and provide incentive to keep up the good work.

The Music Journal (formerly known as Musician’s Practice Journal) helps with all of these areas. It allows you to organise what you practice into folders, time it, set the speed (it even has a built in Metronome), and write any notes or reminders regarding your efforts. You can then view your progress in graph form over a period of weeks, months or years. It’s a simple enough iPad app, but very helpful and even essential if organisation and solid progress is what you’re looking for.

For more information, check out the app developers’ website here: Axe Monkey (this link was broken)

Cost: $7.49

If my writeup is enough to convince you to get it, click here:

Download Music Journal on the iOS App Store

3. Guitar Pro

guitar pro This one is especially aimed at guitarists. If you haven’t yet discovered the powerful computer software that is Guitar Pro 6, do it now. Sure, its getting a little long in the tooth with the next version expected hopefully sometime this year, but still, get it. It’s mainly aimed at those who read and write tablature, but also has helpful tools such as the speed trainer.

Tabs for just about any song on the internet can be found for this software (ending in .gpx or .gp5 etc.) from websites such as Ultimate Guitar and are often more accurate than their text alternatives. While this iPad app works best as a companion to the computer software by providing the sought after ‘mobility factor’, it also functions great as a standalone program.

Highlights from this app include the simple, yet elegant interface and the playback engine which uses something called an RSE (stands for Realistic Sound Engine) to play back your tab in great sounding MIDI. My biggest tip with this one is to download all of the tabs that you could want over a period and copy them to your device via iTunes as doing this in a browser from within the app can be tedious at times.

For more information, check out the app developers’ website here: Arobas Music

Cost: $8.49

If my writeup is enough to convince you to get it, click here:

Download Guitar Pro on the iOS App Store

4. iReal Pro

ireal-pro This app used to be called iReal b (before that iReal Book) and was named for those collections of charts usually associated with Jazz musicians. After a bit of legal stuff, mostly through the inclusion of various charts that hadn’t yet run out of copyright, they decided to change their name and offer an alternative way to get music charts out to consumers of the app. To do this, they get users to upload their own charts to the app’s forums either individually or as a ‘playlist’. The forums are accessed with ease from within the app and don’t require a signup. Within a couple of touches, users can have an entire collection such as ‘Pop 400’ or ‘Blues 50’ downloaded and accessible.

The songs that are acquired as part of the playlist can exist outside of it and be added to your own playlist such as ‘Set List 11-02-14’. After a small learning curve, you can start making your owns charts and if needed, export to pdf and email. This is great when accompanying an original artist or making your own charts to distribute to the band. All charts can also be transposed in a flash, which is helpful when dealing with the dreaded capo. This app is highly customisable.

The final and greatest feature of this app is in its ability to playback charts using any form of MIDI band such as Pop Ballad, Rock, Funk, Country etc. Extra playback styles come as in-app purchases. I bought the Bluegrass style which has been awesome for practicing bluegrass standards. All instruments within the MIDI band can have their volumes individually adjusted and an option is often provided on the type of instrument played. For example, Guitar instead of Mandolin or Acoustic Guitar. This will depend on the style of the band selected.

All in all, this one is a fantastic iPad app and essential for all musicians – except maybe vocalists. Lyrics and this app do not and would never work out. It is also available on Mac OSX.

It must also be noted that this app supports AirTurn. Click to find out more.

For more information, check out the app developers’ website here: Technimo

Cost: $8.49
Pop Styles Pack, including Bluegrass Cost: $5.49

If my writeup is enough to convince you to get it, click here:

Download iReal Pro on the iOS App Store

5. OnSong

onsong

This app is similar to iReal Pro, except in the fact that it is aimed at singers and singer-songwriters. I have to say that this has been the app from the list that I was the most happy about purchasing. In addition to making up your own Lyrics + Chord charts, it has a feature which searches the internet for any that you might require. However, these are sometimes formatted in a strange way or include only a title and artist without any content.

Once you have all of the charts that you require, they can be created within a set list and if necessary, exported as a pdf and emailed in one swift action. This is one of the features that impressed me the most. I recently had a gig on Australia Day with a vocal/percussion accompanist. Through OnSong, I was able to easily email the setlist as text in an email, while attaching every single song chart that we would play as PDFs. All in the same email. Pure awesome.

While the app allows the user to autoscroll which is calculated according to the song length inputed, like iReal Pro, it also supports AirTurn. Click to find out more. As expected, OnSong also allows easy adjustment of things such as the Key of the song. However, to do this properly, you must make sure that all chords in the chart are written in properly using brackets such as [G]. In a way, input of charts provides a sort of coding. Easy-to-follow instructions on how to do this are provided on the apps launch. There is also plenty of support available via the website and a thriving community for OnSong.

While slightly expensive, I make no exaggeration when I call this iPad app ‘essential’.

For more information, check out the app developers’ website here: OnSong

Cost: $13.99

If my writeup is enough to convince you to get it, click here:

Download OnSong on the iOS App Store

Final Thoughts

When I decided to make this list of iPad apps, my housemate mocked my use of the word ‘essential‘. Let me just say that so long as you are a musician and you want to make the most out of your iPad, they are essential! If you don’t have an iPad yet, save your money. It’s time that you started making the most out of technology. 😀

Happy Practicing and Performing!

-Speak soon.

Towards the end of last year while I was overseas, my housemate sent me a message to notify me that he had brought his grandma’s record player home… I didn’t know how to react. While I was really exciting about the prospect of delving into the wonderful world of vinyl, I also knew that it would mean the beginnings of a very expensive and addictive hobby… No, not hobby. Passion. As expected, I returned home with an assortment of great records picked up at various Brooklyn flea markets. Vinyl records have been making a massive comeback over the past few years. The tangible, physical value of vinyl over CDs, in addition to the superior listening experience that a good home setup carries over digital audio is more than enough of a reason for this.  In my trip to the USA, including New York, I was amazed to discover that many of the independent artists out there aren’t evening bothering to press CD’s anymore. What is becoming more and more apparent, is that a new release will be pressed to a limited run of vinyls, which include a digital voucher of the CD, as well as regular digital distribution. To me, this makes perfect sense except for the whole “recorded in digital, pressed to analog” thing. I’m curious whether the sound quality will be all that better.

Our HiFi Setup

So after working for a short time with my housemate’s grandma’s basic 90’s Kenwood vinyl setup, we both decided that it would be a sound investment to buy some more expensive gear and do this thing for real. So off we went to get a vinyl player. Pat (housemate) picked out a nice Sansui P-50 from Classic HiFi in Newtown up the road. Next, was a decent amp. My dad is an electrical engineer and he happens to have lots of nice gear just ‘lying around’. So he lent me his Sansui 555a on a permanent basis. Finally, Pat and I went back to Classic HiFi and picked out a pair of nice sounding Dali Speakers. All setup! …. Except for one thing. A few weeks later, the vinyl collection was getting a little out of hand.

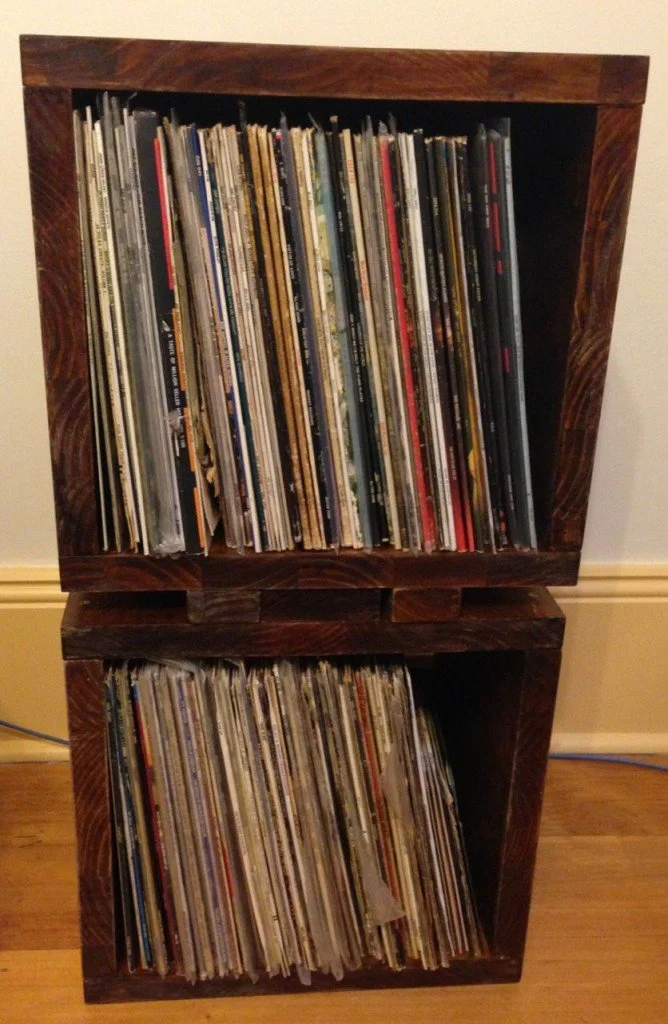
The great vinyl setup in my place, including our new storage solution


Storing Vinyls

After scouring the internet for worthwhile vinyl storage solutions, we decided to go basic and collect a bunch of plastic milk crates. We would spray paint black and it would all work out. Cheap and easy. However, it didn’t work out. The records did not fit into the crates with their protective plastic sleeves. Aargh. That was it. The final straw. So I proposed to Pat that if he bought the materials, I would make us some nice DIY vinyl storage. Another project and an opportunity to get my Handyman-Sam hat on. And so I am lead to writing this post. Here, I’ll put up all of the measurements that I came up with and detail the experience that I had in making this basic storage solution. I’ll warn you, I’m no expert. So I learnt a few lessons along the way. All of which I’ll share with you. If anyone else decides to make something similar, please let me know so I can see how it looks! Feel free to use my design in any way that you wish that isn’t aimed at commercial gain.
 

DIY vinyl storage

Plan of Attack

I wanted my design to be simple, stackable and sturdy. It is shaped like a cube, but a little wider to allow for more records + browsing space. On the back, it has to planks of ply that run over the top and bottom with the aim of added extra strength and squaring the box up to proper 90 degree angles. It uses 30mm pine wood with a walnut varnish and has 2 strips of wood on the bottom and one on the top to allow it to be stacked. All in all, very simple.

Things you’ll need
  • An electric or battery operated drill.
  • An assortment of drill bit sizes including a phillips head attachment.
  • Fine sandpaper. Use either 240 or 320 – no smaller than 240. It should look a grey sort of colour. I made a mistake and got some sandpaper that was too course. It ended up OK though because I was able to smooth out bit of wood that had splintered when it was cut.
  • Turpentine.
  • Stain & Varnish – Pick a colour that you like. I used Walnut Satin.
  • Paintbrushes.
  • 8G x 50mm Timber Screws – 50 pack will be sufficient.
  • Sanding block. You’ll need this. Trust me. Better yet, get an electric sander.
  • Newspaper to put the wood on while varnish dries.
  • Tape Measure.
  • A slab that is a sufficient size for your project. Mine was 900x2100mm.

Materials needed1

slab type


The Process

1. Pick out the type of wood that you want to use. As cheap as ply is, it warps fairly easily. And unless you get anything thicker than 16mm, it might not be sturdy enough. My own research has also lead me to the conclusion that varnish is no good on ply. So if it’s the woody-texture that you’re after, ply is no good. The big slab of ply that we picked out was $89 from Bunnings. In my opinion, that isn’t too bad at all. After all, this is the most important ingredient.

Picking the slab

 2. Cut the wood to size. For our two vinyl record boxes, here are the measurements:

  • Top and Bottom panels = 410x325mm (x4)
  • Side panels = 330x325mm (x4)
  • Back supports = 410×150 (x4)
  • Feet = 325×100 (x2, unless you want both boxes to have them – x4)
  • Top connector = 325×50 (x1, unless you want both boxes to have them – x2)

If you’re lucky, you’ll get all of the measurements cut to size and the friendly guy working at Bunnings won’t charge you for it. I don’t have a table saw, you see.

Slab getting cut
What a legend!
Excited POG
Pat is a mixture of excited and nervous as he hopes all of my measurements are correct.

The panels are cut

The planks are cut

3. Time to get sanding! Whip out that sanding block that I mentioned earlier and sand up the wood until it is nice and smooth using either 240 or 320 grade paper. REMEMBER: SAND WITH THE GRAIN.

4. Paint your first layer of varnish. Make sure you stir the tin before you begin. Don’t layer the brush too thick, otherwise you’ll get too much drip going over the sides of the wood. Paint one side, let it dry and paint the other. This is the part where you have to be the most patient. When you set it up to dry, I would recommend against lying it flat on the newspaper like I did. It increases the possibility that the wet parts will stick to the newspaper which is a massive pain to peel off. Best set it up on an angle like you’ll see a bit lower.

varnish layer 1

5. After the first coat is all dry on both sides, time to get sanding again. This is also an opportunity to look over the job that you did and sand out any drip or remove brush hairs that you didn’t catch during the first layer.

sanding block

sanded layer 1

6. Once you’ve sanded this layer back nice and smooth, get painting on another coat. Same drill as before, where you’ll be really careful with any drips and lose brush hairs. Slow and steady, my friends. Don’t rush it by slapping a whole bunch on the wood at a time. Here is where I decided to start laying the drying wood against the wall on an angle. Much recommended, so long as the base is on about 45degrees to the floor.

varnish layer 2

varnish layer 2a

varnish layer 2b
Yes, I was playing some guitar in between working on this project. The fumes were pretty strong.

7. Guess what, time to sand again! If you’re doing a really good varnish job, your main goal here should be the smoothness factor. For me, I was happy with two layers of varnish. So after sanding, I commenced the fun part – puting it together!

sanded layer 2

the final pieces all varnished
My finished pieces, ready to assemble.
Project mascot, Angie
The finished pieces with my project mascot, Angie. As cute as she is, she would make a great tradesman’s dog. She is more than content with sleeping on the rug beside me while I work.

8. Sitting the top or bottom panels above the sides, estimate some good spots to screw in and mark them with a pencil. Using a drill bit around the same size as the screw, drill in accordingly. I think the one that I used was about 3mm. After the pilot holes are all made, get a larger drill bit and drill into the wood just a little bit to be sure that the head of the screw won’t stick out at all. This is essential for a final, polished look.

pilot hole drill bit

screw it together

pilot hole

9. Once the top and sides are all screwed in, attach the panel supports on the back. Don’t be shy about being forceful when squaring up the corners with the boards. This part will be necessary in making an equal box. Drill in screws as before and use as many as you feel you need.

screw on back

screw on back 2

10. The final part of this project is attaching the wood that will allow the boxes to lock together. I had a whole bunch of trouble with this part because my friendly Bunnings cutter didn’t do too good a job on the dimensions of my pieces of wood. Even still, do the best with what you have and be sure to use that tape measure with plenty of patience.

11. All finished! Carry your handy-work inside and set it up somewhere that all of your vinyl-collecting friends will be sure to see, and be jealous of. Well done!

Here is my finished product:

The finished product 1

the finished product 2


Final Thoughts

You know what they say… ‘If you want something done right, do it yourself.’ And so far, I’ve yet to find any DIY vinyl storage solutions that are simple, cheap and long-term. I’ve managed to make a set of quality boxes for less than $120 with less than a day’s solid work if you don’t count all of the time spent waiting for the varnish to dry. They also look greatEnjoy!

You know those things that we intend to do, but don’t often get around to doing? Those tasks that slowly eat away at both our sanity and patience until we finally reach a point where we say “no more”? If you don’t know what I mean, see the following video:

httpv://www.youtube.com/watch?v=E9tRGMBGzNs
Recently, on a return trip from the Blue Mountains to visit my sister, a friend of her’s mentioned that he had just built “one of those IKEA Pedalboards”. I was intrigued. We discussed some of the basics and I spent the rest of the day scouring forums and doing some research on it.

Here are some of the great resources that I came across in my research:

* Harmony Central – Official IKEA/GORM Pedalboard Appreciation Thread

* The Gear Page – My IKEA Gorm Pedalboard Build Thread

* End of the Game – DIY Effects Pedalboard

For a long, long time I’ve wanted to get my pedalboard situation sorted. I’ve got some nice gear, but the board itself has always been the weakest link. I currently have the CnB Pedalboard/Case:

CnBpedalboard

It isn’t entirely bad. It can be done up with a lid which has a handle and acts as a sort of flight case. The exterior is also sturdy enough for most forms of transport… I would be dubious about putting it on a plane though.

The main shortfalls with this board are:

  1. The sides of the base have a lip, so unless you are using a lead with a right-angled plug on the input and output of the board, space is wasted.
  2. The board says it will fit 8 pedals, which is fine – if you only use the one standard size pedal in addition to right angled plugs on your leads (see above). Unless mounted on some woodblock or something, I’d say the board fits a max of 5 pedals.
  3. In an effort to allow players to velcro their pedals straight to the board, the base is lined with this carpet-sort of material. It is thin and nasty and no pedal will stick to it – ever. Good thought, bad execution.
  4. Since the board is basically just a flat box, there is no room to fit a power-brick and nowhere to hide your cables and wiring. When the pedals are in and (unsecurely) placed, it looks bad.
  5. Aesthetics are important. (see above).

A couple of months ago, I had considered getting a Pedal Train… but with a price-tag of around $300 for the one that I wanted, I just couldn’t justify it.

Enter, the IKEA Gorm Pedalboard.


What is it?

The board is based on the IKEA Gorm Shelves. They come in packs of two and can be purchased with either 3 slats or 5 slats:

gormshelf

  • As a softwood material, the completed pedalboard will be cheap, light, and with proper support, strong.
  • Due to the fact that the board comes in pack of two, there will also be plenty of extra wood to angle the board comfortably and brace any weak sections.
  • Finally, the slatted design of the shelf is useful for tidying cables and hiding power, which makes the board good to go with very little effort.


Plan of Attack

Before we begin with the process, let me outline my intentions with my board.

Firstly, I decided to purchase the set of 5 slat shelves, with the plan to create 2 boards – A large one (4 slats) for my electric guitar setup, and a small one (3 slats) for my acoustic guitar setup. I want to make my board look as pro as possible which means sweet carry handles, a glossy colour finish, and all power and cable routing as out of site as possible. I want these boards to last me forever… Or at least until I’m motivated enough for another similar DIY project.


What I Used
  • 2x Cans of Spray Paint – I picked green because it is a badass colour. If you are only making one board, 1x can will do fine.
  • Velcro – This is a really important ingredient for this project and if skimped on, has the potential to create a whole heap of unnecessary frustration. I got 2x 5m rolls of loop and 1x 3m roll of industrial strength hook. Again, if only doing one board, 1x roll of 5m loop will be sufficient.
  • Rubber Feet – 2x four packs should do the trick. Black is a good colour for this.
  • 4x handles – Two for each of my boards. Different boards, different handles.
  • Right-angle brackets – I only bought four but had two lying around. I used six, so you should get six.
  • Sand Paper – You’ll need this to smooth out the wood for painting, and to strip back the paint for the Velcro adhesive.
  • Cable-Ties – get a packet of medium to large ones
  • Power board – get one with surge protection (most have it) and wider-spaced plugs. The wider spacing will be useful for those vintage pedals with large power-supplies. You’ll need two of these if you’re doing the extra board, obviously.
  • A device that can power many of your pedals from a single source. I have the Artec SPB-8 Power Brick. Well regarded examples include:
  • Saw – This is required to cut the wood.
  • Cordless Drill – To make holes in the wood for screws cable-ties.
  • 2x 77x51cm Gorm Shelves – Get the smaller one if you like. For me, the more wood to work with the better.


HardwareItems

velcro

powerboardcableties


The Process

 1. Cut your shelf according to how large you want your board. Since I’m making two, I cut one with 3 slats and one with 4. Keep the off-cuts.

shelvescut

2. Cut the 2-slat board so that you now have 3 individual slats (with the end still attached). Two of these will be used to wedge the board up, the third will be cut in half and used as braces to strengthen the board.

shelfwedges

3. Sand everything. The smoother you do it, the cleaner the end result will be. I used an electric sander – which kicked ass. In hindsight, I was a little lazy on this area so do it well.

sandbackshelf

4. Cut the single slat to size by firstly measuring it to the larger board and then the smaller. You should have the perfect amount. With a hammer, knock off the end pieces of this slat to give a bit extra in length.

shelfbrace

5. Securely screw the brace to the board and sand it back further. Now we have strength!

fastenbrace2

6. Now attach the right angle bracket to the single length slats. This will wedge our board up at a comfortable angle.

largeboardfinish

smallboardfinish

7. For better weight distribution and for the sake of the board’s back rubber feet, I decided to sand off the base a little. Necessary? Not sure. Seems to work though.

sandunderneathe

8. Time to paint! I decided to use spray paint because I figured that it would be cheaper ($10 per can) and it is touch dry within 20-30mins. One of my favourite colours is green, so I painted my boards that colour. You will need to do several layers to make it nice and glossy.

Paintpedalboards1

Paintpedalboards2

9. In between paint drying sessions, I decided to mutilate the base of my pedals – which is essential if you want the Velcro to stick properly. All pedals come with rubber underneath and for some, it covers the entire base. Peel this off with a flat-head screwdriver and attach the industrial-strength hook velcro.

velcropedals

10. The multi-layers of paint have now dried and the board looks great. (It was a very sunny spot where I took this photo, so the white bits are reflections of light.)

allpainted

11. Time to add the handles… I didn’t screw mine on directly in the middle. I moved them up a bit to support the added weight from the wedge and from the power supply that will sit below.

instalhandles1

handlesinstalled

12. Apply your rubber feet. I’ve seen a few builds of this where they added upwards of eight but I only used four. Drill the back wedge end on a bit of an angle so it works with that extra sanding that you did.

rubberfeet

13. Sand back the sections of your panels where Velcro will sit. The adhesive will stick better to a matte surface.

sandpaint

sandedpaint2

sandedpaint

14. Run along two rows per panel of the loop Velcro roll. You will very quickly discover why we bought 10m.

velcroapplied

15. Attach power-board and power-supply by drilling any necessary holes to the back and using cable-ties.

attachpower

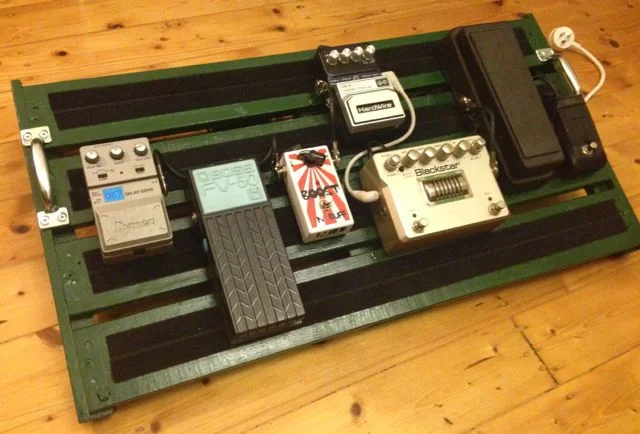
16. Figure out where you’re going to place your pedals and wire them up! FINISHED! (For more information on position of effects in the chain, click HERE. I’ll write up an article on this at some point in the future…)

Figure out their order and wire them up


Final Thoughts

The end product is sturdy and practical. I’ve still got a few more pedals on order/loan that I’ll need to add to the mix at some point soon which will be no issue as this board can more than handle it. This project was fun and beneficial. Highly recommended if you have the time and motivation!